Every St. Patrick’s Day, my kitchen turns into a green wonderland—and these St. Patrick’s Day Green Shake Pudding Cups are always the star! I first whipped them up when my niece begged for “something magical and green” (but secretly healthy) for her class party. The look on her face when she realized the vibrant color came from spinach? Priceless. Now they’re our go-to festive treat—quick enough for busy weeknights but special enough for celebrations. The best part? You get creamy vanilla pudding layered with a sweet green shake that’s packed with nutrients. Trust me, even the pickiest leprechauns will be begging for seconds!

Why You’ll Love These St Patrick’s Day Green Shake Pudding Cups
Let me tell you why these little cups of green magic have become my absolute favorite St. Patrick’s Day treat—and why they’ll be yours too:
- Quick & no-cook: Seriously, you’re 10 minutes away from festive perfection. No oven, no fuss—just blend, layer, and chill while you prep the rest of your party spread.
- Sneaky-healthy: That gorgeous green isn’t food coloring—it’s fresh spinach blending right into the sweet shake! Kids (and adults) gobble it up without a single “eww, veggies?” complaint.
- Party-ready: The layered look in clear cups makes them almost too pretty to eat—almost. They’re instant table decor that doubles as dessert!
- Kid-approved magic: My littlest cousin calls them “leprechaun potions.” Let them top with sprinkles or whipped cream clouds for extra fun.
- Customizable: Dairy-free? Use almond milk. Want it thicker? Toss in that frozen banana sitting in your freezer. This recipe bends to whatever you’ve got on hand.
Honestly, the hardest part is waiting those 30 minutes while they chill—but watching everyone’s eyes light up when you bring them out? Totally worth it.
Ingredients for St Patrick’s Day Green Shake Pudding Cups
Here’s the magic list that turns into those vibrant green cups of joy! I’ve learned through many batches that these exact measurements make all the difference—especially that packed spinach (trust me, it disappears into sweetness).
- 2 cups fresh spinach (packed): Don’t skimp here—really press it into your measuring cup. The deep green makes that festive color without any weird veggie taste.
- 1 large banana (frozen for thicker texture): My secret weapon! Frozen gives that creamy milkshake consistency. If using fresh, add a handful of ice.
- 1 cup whole milk (or almond milk for dairy-free): Whole milk makes it richest, but I’ve used everything from oat to coconut milk in a pinch.
- 1 tbsp honey: Start here, then taste. Some bananas are sweeter than others—I often add an extra drizzle.
- 1 tsp vanilla extract: The flavor booster! Pure extract makes all the difference over imitation.
- 1 cup vanilla pudding: Store-bought works great, but homemade pudding? Absolute next-level magic.
- Whipped cream (optional): Because everything’s better with a cloud on top! I sometimes mix green food coloring into mine for extra fun.
- Green sprinkles (optional): The kids love hunting for these “leprechaun dust” specks in every bite.
See? Nothing fancy—just simple ingredients that transform into something special. Now grab your blender and let’s make some magic! You can find more fun recipe ideas on our main recipes page.
How to Make St Patrick’s Day Green Shake Pudding Cups
Okay, here’s where the real magic happens! I’ll walk you through each step so your pudding cups turn out as dreamy as mine always do. Just promise me one thing—don’t skip that chilling time at the end. It makes all the difference between good and “OH MY GOODNESS” amazing.
Step 1: Blend the Green Shake
First, grab your blender (that dusty thing in the back of your cabinet counts!). Toss in the spinach, banana, milk, honey, and vanilla. Now here’s my pro tip: blend for a full 30 seconds, stop to scrape down the sides with a spatula, then blend another 15 seconds. You want that shake smooth as a leprechaun’s silk hat—no spinach flecks allowed!
If it’s not blending easily, add a splash more milk. I’ve made this mistake too many times—patience is key. When it’s done, you’ll have this gorgeous emerald green liquid that somehow smells like banana cream pie instead of veggies. Kitchen magic, I tell you!

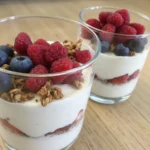
Step 2: Layer the Pudding Cups
Now for the fun part! Grab your clear cups—I use 8oz mason jars because they’re cute, but any glasses work. Pour that vibrant green shake to fill each cup about halfway. Then gently spoon vanilla pudding over the back of a teaspoon to create a clean layer on top. Don’t stir—we want those pretty distinct layers!
Here’s where I sometimes cheat: if I’m in a hurry, I’ll use store-bought pudding. But when I’m feeling fancy (or impressing my mother-in-law), I make homemade pudding the night before. Either way, this step takes maybe 2 minutes tops. Easy peasy!
Step 3: Add Toppings and Chill
Time for the grand finale! If you’re using whipped cream, dollop it on now—I like to make little peaks with a spoon. Then shower on those green sprinkles like you’re decorating a tiny edible Christmas tree. Or skip the toppings for a simpler (but still delicious) version.
Now the hardest part: walk away. Seriously, pop these in the fridge for at least 30 minutes. I know it’s tempting to dig in immediately (I’ve been there), but that chill time lets the flavors meld and gives the shake layer that perfect pudding-like texture. Set a timer if you must—your patience will be rewarded with the creamiest, most festive bites ever!
Tips for Perfect St Patrick’s Day Green Shake Pudding Cups
After making these more times than I can count (and yes, sometimes messing them up royally), I’ve learned a few tricks that take these from “pretty good” to “can I have the recipe?” status. Here are my hard-earned secrets:
- Freeze that banana overnight: I can’t stress this enough—it transforms the texture from thin shake to luxuriously thick. No icy chunks either, just creamy perfection. If you forget? Toss in 3-4 ice cubes while blending.
- Taste as you blend: Depending on your banana’s ripeness, you might need extra honey. I always do a quick spoon test before pouring. Too sweet? A squeeze of lemon juice balances it beautifully.
- Chill your cups first: Sounds fussy, but 10 minutes in the freezer before assembling keeps everything extra cold. Bonus: the layers stay picture-perfect longer at parties.
- Layer like a pro: Pour the green shake over the back of a spoon to prevent it from mixing with the pudding. And don’t overfill—leave room for that whipped cream mountain!
Oh, and one last thing—if your spinach turns the shake brownish (it happens with older greens), add a tiny pinch of baking soda. Not enough to taste, just enough to keep that vibrant green we all love. Now go forth and make magic! If you need more inspiration for fun holiday treats, check out our desserts section.
Ingredient Substitutions & Variations
Listen, I know we don’t always have every ingredient on hand—or sometimes you just want to mix things up! Here are all the swaps and tweaks I’ve tested that still give you those magical St. Patrick’s Day Green Shake Pudding Cups:
- Out of pudding? Greek yogurt works beautifully for that creamy layer—just sweeten it with a bit of honey first. Or go wild with coconut cream for a dairy-free option!
- No honey? Maple syrup does the trick, or agave if you’re feeling fancy. Even regular sugar works in a pinch—just blend it with the milk first so it dissolves completely.
- Not a banana fan? Try 1/2 an avocado instead—same creamy texture, and you’ll never taste it under all that vanilla goodness.
- Want extra protein? Toss in a scoop of vanilla protein powder with the shake ingredients. My gym-obsessed brother swears by this version!
- Feeling adventurous? Add a handful of mint leaves to the blender for a “shamrock shake” vibe that’ll knock your socks off.
The beauty of this recipe? It’s like your kitchen’s magic wand—wave it however you want and something delicious always appears. Just promise me you’ll keep that green spinach base—that’s where the real leprechaun magic happens! For more visual ideas, feel free to browse our Pinterest board.
Serving and Storing St Patrick’s Day Green Shake Pudding Cups
Okay, here’s the deal – these little cups of green goodness are best served ice-cold straight from the fridge. I learned this the hard way when my nephew couldn’t wait and dug into a room-temperature one – let’s just say the layers weren’t as magical! For the perfect experience, pull them out just before serving (those 30 minutes of chilling time I keep harping about? Worth every second).
Now, if you’re prepping ahead (party pro tip!), here’s how to store them right: pop a piece of plastic wrap directly on the surface before covering with lids. This keeps the whipped cream from getting weird and prevents that pesky pudding skin from forming. They’ll stay fresh in the fridge for up to 2 days – though in my house, they never last that long!

One important note – these don’t freeze well (trust me, I tried during my “meal prep phase”). The texture goes all grainy when thawed. But hey, that just means you’ve got the perfect excuse to enjoy them fresh! If you absolutely must save some, store just the green shake portion in the freezer, then blend with a splash of milk before assembling when ready to serve.
St Patrick’s Day Green Shake Pudding Cups Nutrition Info
Now, I’m no nutritionist—just a home cook who likes to know what’s going into my family’s treats—but here’s the scoop on these festive cups. Remember, these numbers dance around depending on your exact ingredients (like that extra dollop of whipped cream I can never resist!).
Each serving packs a surprising nutritional punch thanks to that sneaky spinach base. You’re getting natural vitamins from the greens, potassium from the banana, and calcium from the milk—all while feeling like you’re eating dessert! The honey adds sweetness without refined sugar, and if you use homemade pudding, you control exactly what goes in.
That said, if you’re watching specific macros or have dietary needs, definitely tweak the recipe to fit. Swap sugar-free pudding, use less honey, or skip the whipped cream topping. The beauty is how adaptable these are! If you are looking for other healthy options, check out our Spicy Chickpea Quinoa Power Bowl.
Remember: Nutritional values are estimates. Variations in ingredients and portion sizes affect totals.
FAQs About St Patrick’s Day Green Shake Pudding Cups
Over the years, I’ve gotten all sorts of questions about these magical green cups—from panicked texts (“Help! My shake is brown!”) to curious grandmas wondering if they’re really healthy. Here are the answers to everything you might be wondering:
Can I make these vegan?
Absolutely! I’ve done it dozens of times for my dairy-free friends. Just use almond or oat milk instead of regular milk, swap the honey for maple syrup, and top with coconut whipped cream. The pudding layer is the trickiest—look for a vegan vanilla pudding mix or make your own with cornstarch and plant-based milk. Works like a charm!
Why did my green shake turn brown?
Ah, the spinach betrayal! This happens when the greens oxidize—usually from older spinach or blending too long. Don’t worry, it still tastes great! To prevent it: 1) Use super fresh, crisp spinach 2) Blend just until smooth (no over-processing) 3) Add a tiny pinch of baking soda (seriously, just a pinch!) to lock in the color.
Can kids taste the spinach?
I swear on my lucky four-leaf clover—no! The banana and vanilla completely mask the spinach flavor. My pickiest eater nephew once ate three cups before asking what made them green. When I told him, he just shrugged and said “Cool. More please!” The honey and vanilla work magic on those taste buds.
How far in advance can I make these?
For best texture, I recommend assembling no more than 4 hours before serving. But here’s my party trick: blend the shake portion up to 24 hours ahead (store in the fridge), then quickly layer with pudding right before your event. The shake might thicken overnight—just give it a quick stir or add a splash of milk before using.
What if I don’t have clear cups?
No stress! Regular bowls work fine—they just won’t show off those gorgeous layers. For a fun alternative, try green-tinted glasses or even hollowed-out oranges (for a citrus twist!). At my daughter’s school party, we once served them in mini mason jars with “Leprechaun Potion” tags tied with green ribbon. Total hit!
Final Thoughts
There you have it—my foolproof way to make St. Patrick’s Day magic in a cup! I’d love to hear how yours turns out. Snap a pic of those gorgeous green layers and tag me—nothing makes me happier than seeing your kitchen adventures. Now go charm some leprechauns with your new favorite treat!